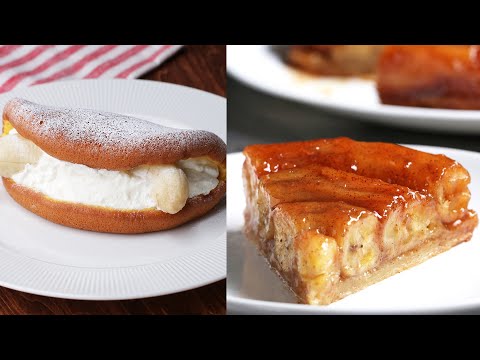
あなたはどっちのバナナスイーツが好き?
バナナを丸々1本をホイップと挟んだオムレットと、バナナを贅沢に6本使ったキャラメルソースたっぷりのアップサイドダウンタルト♪
どっちも甘くてとってもおいしいです!
ぜひ作ってみてくださいね♪
00:12 バナナオムレット
https://www.buzzfeed.com/jp/sonomishimada/banana-omelet
01:17 キャラメルバナナのアップサイドダウンタルト
https://www.buzzfeed.com/jp/yuitakahashi/upside-down-banana-tart-jp
フライパンで簡単♪バナナオムレット / Banana Omelette
1人分
材料:
■オムレット
グラニュー糖 30g
薄力粉 20g
牛乳 大さじ1
溶かしバター 5g
卵 1個
■クリーム
生クリーム 100ml
グラニュー糖 10g
バナナ 1本
粉砂糖 適量
作り方
1. オムレットを作る。ボウルに卵を割りほぐしてグラニュー糖を加え、白っぽくなってもったりとするまでハンドミキサーで泡立てる。
2. 薄力粉をふるい入れ、ゴムベラでさっくりと混ぜ合わせる。
3. 粉気がなくなったら、溶かしバターと牛乳を混ぜ合わせて全体に回し入れ、生地につやが出るまでゴムベラで混ぜる。
4. フライパンにうすく油(分量外)を塗って弱火で熱し、生地を流し入れたら蓋をして、7分焼く。焼けたら焼き目のついたほうを上にして、網などの上にのせて冷ます。
5. ボウルに生クリームと砂糖を入れ、ハンドミキサーでゆるめに泡立てる。
6. オムレットの上にクリームを縁を2cmほど残して塗り広げ、バナナを手前に置いて半分に折る。粉砂糖をふりかけたら、完成!
===
パイシートで簡単♪キャラメルバナナのアップサイドダウンタルト / Caramel Banana Upside Down Tart
20cm丸型、8人分
材料:
パイシート 1枚(23x23cm)
バナナ 6本
ブラウンシュガー 200g
無塩バター 110g
バニラエクストラクト 小さじ1
シナモン 小さじ1
バニラアイス 適量
作り方
1. オーブンは190℃に予熱しておく。
2. パイシートをケーキ型の底の大きさに合わせて丸く切り、フォークを使って全体に穴を開ける。
3. バナナの上下を切り落として皮をむく。うち2本は半分に切る。
4. キャラメルソースを作る。鍋を中火で熱してバターを溶かし、ブラウンシュガーを加えて、琥珀色になるまで煮詰める(約5分)。
5. バニラエクストラクトとシナモンを加えて混ぜたら、バナナを加える。2分ほど加熱して、バナナがやわらくなったら、うら返してキャラメルを絡める。
6. ケーキ型に油(分量外)をうすく塗って、バナナをすき間なくしきつめる。キャラメルソースをまわしかけて、(1)を被せて端を内側に折り込む。
7. 190℃のオーブンで30分焼く。パイシートにこんがりと焼き色がついたら取り出し、30分以上冷ましてから皿をかぶせてひっくり返し、型から抜く。
8. 好みの大きさに切り分け、バニラアイスを添えたら、完成!
===
Here is what you'll need!
Banana Omelette
Servings:1
INGREDIENTS
■ Omelette
1 Egg
30 grams Granulated sugar
20 grams Flour
5 grams Melted butter
1 tablespoon Milk
■ Cream
100 milliliters Heavy cream
10 grams Granulated sugar
1 Banana
Powdered sugar
PREPARATION
1.Make the omelette. Break eggs in a bowl, add granulated sugar and whisk with a hand mixer until it becomes whitish.
2.Sift the flour and mix thoroughly with a rubber spatula, until there is no visible dry flour
3. Mix the melted butter and milk in a small bowl and sprinkle over the egg batter, mix with a rubber spatula until the dough becomes glossy.
4. Apply a thin layer of oil to a frying pan, heat over low heat, pour in the dough, cover and bake for 7 minutes. Remove from heat, put the grilled side up and place it on a cooling net to rest.
5.Pour heavy cream and sugar in a bowl and whisk loosely with a hand mixer.
6.Spread the cream over the omelette leaving about 2 cm of the edges without cream, place a whole peeled banana on the bottom half of the omelette, and fold it in half. Sprinkle with powdered sugar to finish.
7. Enjoy!
---
Caramel Banana Upside Down Tart
Servings:8
INGREDIENTS
1 Pie sheet (23cmx23cm)
6 Bananas
110 grams Butter
200 grams Brown sugar
1 teaspoon Vanilla extract
1 teaspoon Cinnamon
Vanilla Ice Cream to serve
PREPARATION
1.Preheat the oven to 370°F.
2.Cut the pie sheet into a circle using your cake mold as a measure, and use a fork to make small holes all over for ventilation.
3. With a knife, remove the top and bottom of the bananas, and cut 2 in half.
4.Make the caramel sauce. Heat the pan over medium heat to melt the butter, add brown sugar and cook until it becomes amber in color (about 5 minutes).
5.Add vanilla extract and cinnamon, and mix. Place the bananas in the caramel sauce and cook for about 2 minutes, until the bananas start to soften, turn them around to get them fully coated in sauce and heat for another 2 min.
6.In a lightly oiled cake mold place the bananas so that they are packed tightly. pour the caramel sauce on top, cover with the pie crust (1) and use a fork to fold the ends inward.
7.Bake in an oven at 370°F for 30 minutes. When the pie sheet has slightly browned, remove from the oven, allow it to cool for at least 30 minutes, cover with a plate, turn over, and remove from the mold.
8.Cut into the desired size and serve with vanilla ice cream.
9.Enjoy!
---
Check us out on Twitter! https://twitter.com/TastyJapan
Check us out on Instagram! https://www.instagram.com/tastyjapan/
#TastyJapan #レシピ
MUSIC
Licensed via Audio Network
side plate size cm 在 MosoGourmet 妄想グルメ Youtube 的精選貼文
まさかこんなにハマるとは思っていなかったアニメ「鬼滅の刃」。決定的だったのは第19話「ヒノカミ」の「竈門炭治郎の歌」をバックにしたアニメーション!禰豆子の「血鬼術 爆血!」は最終回かと思うくらいのクライマックスでした!炭治郎がお父さんから「必ず途切れさせず継承していってくれ」「約束なんだ」と言われた耳飾り。僭越ながら作ってみました。
「俺と禰豆子の絆は誰にも、引き裂けない!」
(クッキングシート使用上の注意 https://www.lion.co.jp/ja/products/246 )
*レシピ*
1.プラバンの裏を400番のヤスリ(ダイソー)でくるくると全面ヤスル。
2.全体が白くなったらウエットティッシュなどでゴミを落とす。
3.プラバンが乾いたら、ヤスリをかけた面に鉛筆で型紙を写し取る。
4.色鉛筆で着色する。
5.ハサミで枠のほんの少し内側を切る。
6.2分ほど予熱したオーブントースターで焼く。オーブンシートにのせ、オーブントースターに入れると数秒で縮んでくるので目を離さないこと。(クッキングシート使用上の注意 https://www.lion.co.jp/ja/products/246 )縮むのが止まったら一呼吸おいてオーブンシートごと取り出す。今回、縦長のデザインなので焼いている途中でひっくり返しになることが多かった。着色面(裏)を上にして焼き、ひっくり返って最終的に着色してない面(表)が上になるようにしました。10センチ以上の大きさのプラバンを焼くのは難しいようです。
7.熱に強い、固く平らな物の上に置き、金属のバットなどでプレスする。熱いので気をつけて!
8.冷めたら、色落ちを防ぐために水性トップコートスプレー(Mr.hobbyの つや消し)を裏面(色鉛筆面)にスプレーする。
9.1.5ミリのハンドドリル(キャンドゥ)やピンバイスで穴を空ける。
10.手芸店(ユザワヤ)で買ったイヤリングパーツとプラバンを9ピンで繋ぎました。ラジオペンチや指かん(ダイソー)も100円ショップで買うことができます。
11.でけた。
作る前にやっておくこと
1.プラバン(キャンドゥ)は5センチ四方に切り、板の方向を書き込んで試し焼きをする。板によって縦横の縮み方、反り方が異なるので、その板の性格を知っておくと便利です。
2.プラバンの縦横の方向と表裏が、わかるようにマスキングテープなどで印を付ける。
3.プラバンを切る。いくつか作る場合はデザインの縦横を同じ方向にする。プラバンの縮み方が揃ってきれいに仕上がる。
We never thought that the animated series "Demon Slayer: Kimetsu no Yaiba" would be so addictive!
The decisive moment was in episode 19, "Hinokami", the animation with "The song of Tanjiro Kamado" in the background!
Nezuko's " Blood Art - Exploding Blood" was a climax was worthy of being the final episode.
The earrings Tanjiro inherited from his father, saying, "Please let them pass on interrupted" with him replying "I promise." We audaciously tried to make them ourselves!
"I will let nobody break the bond between Nezuko and I!"
*Recipe*
1. File down around the back of the plastic base with a number 400 file (sold at Daiso).
2. Use a wet tissue to remove dirt etc. when the plastic base becomes white.
4. When the plastic base has dried, use a pencil to trace onto pattern paper the face that was filed down.
5. Use scissors to cut a little into the frame.
6. Bake for about two minutes in a pre-heated oven toaster. Place on an oven sheet and do not let out of your sight as it will start to shrink in a few seconds. Once it stops shrinking, take one breath and remove from the oven, oven sheet and all. This time since the design was lengthwise, there were many times when it flipped over when being baked. We decided to put the colored face (the back) face up and bake, flipping it over so that in the end, the face without color (the front) ends up on top.
It seems to be difficult to bake a plastic base that is over 10 cm.
7. Place on a hard, flat, heat-proof surface and press down with something like a metal plate. It's hot, so be careful.
8. Once it has cooled, spray the reverse side (the side that is marked with colored pencils) with topcoat spray (Mr. hobby's anti-gloss spray) to prevent discoloration.
9. Use a 1.5 mm hand drill (sold at Can-do) or a pin vice to create holes.
10. We connected the plastic base with an earring set bought at a craft shop (Yuzawaya). You can buy radio pliers or jump ring closing tools (Daiso) at 100 yen shops.
11. All done.
Preparation:
1. Cut the plastic base (Can-do) into 5 cm squares and create markings in the direction of the base, then do some trial baking. According to the base, the way that it will shrink length-wise and width-wise will differ, so it is convenient to understand the characteristics of the base.
2. Use masking tape to indicate the frontside and backside of the plastic base.
3. Cut the plastic base. If you are making several at once, make sure to cut them in the same size length and width-wise. This will ensure that the plastic base will shrink in the same way when heated and turn out nicely.
#KimetsunoYaiba #鬼滅の刃 #DIY #craft #DemonSlayer #ASMR
side plate size cm 在 MosoGourmet 妄想グルメ Youtube 的精選貼文
#KitKat #Cake #Recipe #ASMR #OddlySatisfying #音フェチ
We used KitKats to make little houses with the molds we bought from MUJI. These were limited-edition, Ice Cream flavored Baked KitKats, so they were prefect for baking! By torching them with a burner, you can really enjoy the melty and crispy textures together at once. To balance the sweetness of the KitKats we didn't make the houses very sweet.
These were loosely designed with a Twin Peaks lodge in mind.
*Recipe* (4 houses)
1. Apply a thin layer of salad oil in the mold.
2. Mix 110g of unsalted butter that has been returned to room temperature.
3. Mix in 40g of granulated sugar.
4. Add in beaten eggs a little bit at a time, mixing it well each time.
5. Sieve 80g of soft wheat flour and 60g of almond powder and mix lightly.
6. Mix in 1tsp of rum.
7. Place 6 in a squeeze bag. (Because the pattern of the mold is fine this time)
8. Squeeze 7 into the mold. Let it settle.
9. Lightly drop it a few times to remove the air.
10. Pre-heat the oven to 180 degrees, and bake for 25 minutes.
11. Let it cool in the mold after it is done baking.
12. After cooling, remove it from the mold.
13. Using melted white chocolate as a glue, place the KitKat onto 12.
14. Use a burner to torch the Kit Kat and enjoy. You can decorate each one individually, but it is also fun to line the houses up on a large plate and decorate them with loosely whipped fresh cream and cookies.
reference
House size
Bottom side 7.1 × Wall 5.0 × One side of the roof 3.8 cm.
From the floor to the roof top 6.6cm
cf. Another recipe https://youtu.be/o_5hhhXgENk
以前、無印良品で買った型で焼いたおうちにキットカットの屋根を付けてみました。このアイスクリーム味のキットカットは期間限定品の焼いておいしい焼きキットカットです。バーナーで炙るとトロっとサックっとが一緒に味わえておいしい。おうちはキットカットとあわせるて食べることを考えて、甘さ控えめです。
ほんとはちょっとだけツイン・ピークス的ロッジをイメージしてました。
*レシピ*(おうち4棟分)
1.型に薄くサラダ油を塗っておく。
2.室温に戻しておいた、無塩バター 110gを混ぜる。
3.グラニュー糖 40gを入れ混ぜる。
4.溶き卵を少量づつ加え、その都度混ぜる。
5.薄力粉 80gとアーモンドパウダー 60gをふるい入れ、さっくり混ぜる。
6.ラム酒 小さじ1も加え混ぜる。
7.絞り出し袋に6を入れる。(今回、型の模様が細かいため)
8.7を型に絞り出す。ならす。
9.台に軽く数回落とし、空気を抜く。
10.180度に予熱したオーブンで25分焼く。
11.焼きあがったら型ごと冷ます。
12.冷めたら型から取り出す。
13.12に溶かしたホワイトチョコレートでキットカットを貼る。
14.バーナーでキットカットを炙ってからいただく。ひとつひとつ盛り付けるのもいいけど、大きなお皿におうちを並べ、ゆるく泡立てた生クリームとクッキーなどを飾ると楽しい。
パウンドケーキを作って切るという手もあります。
その時の参考までにお家のサイズですが底辺7.1✕壁5.0✕屋根片側3.8cmです。建物てっぺんまでは床から6.6cmです。
参照動画 https://youtu.be/o_5hhhXgENk